
Everything you need to build a winning capability statement
A screen-by-screen walkthrough of the whole platform, illustrated with the sample company ABC Technologies, LLC. Search it, print it, or download the entire guide as a PDF. Updated August 23, 2026.
Capability Statement Studio turns your company record into a submission-ready, one page US Letter PDF. Six screens, in order, take you from raw company data to a tailored document you can send to a contracting officer.
Step 1
Import
DSBS, SAM.gov, upload
Step 2
Workspace
Sections and facts
Step 3
Tailor
One SAM.gov notice
Step 4
Designer
Template and space
Step 5
Edit
Optional fine tuning
Step 6
One Letter page
- 1
Import brings the facts in
Pull your company record from SBA DSBS or SAM.gov, upload an existing statement, or type the details yourself. Nothing else works well until this is right, because every later screen reads from it.
- 2
Workspace is your single source of content
Profiles, section text, certifications, past performance, and your logo live here. One profile is active at a time, and the active profile drives the builder, the designer, and the PDF.
- 3
Tailor aims the content at one opportunity
Paste a SAM.gov Notice ID, let the analysis read the notice and its attachments, then apply the recommendations you agree with. Your original wording is always recoverable.
- 4
Designer lays it out and renders the PDF
Pick a template, set how much of the page each section gets, adjust colors and type, then generate a single page PDF. Every saved document lands in your library.
Tips
- The step counter at the top of Import, Workspace, and Tailor tells you where you are in the six step flow.
- You can jump between screens at any time. Your work is saved as you go.
An account keeps your profiles, documents, and AI allowance attached to you. You can browse the app and build a draft before signing up, but saving documents and using AI features requires an account.
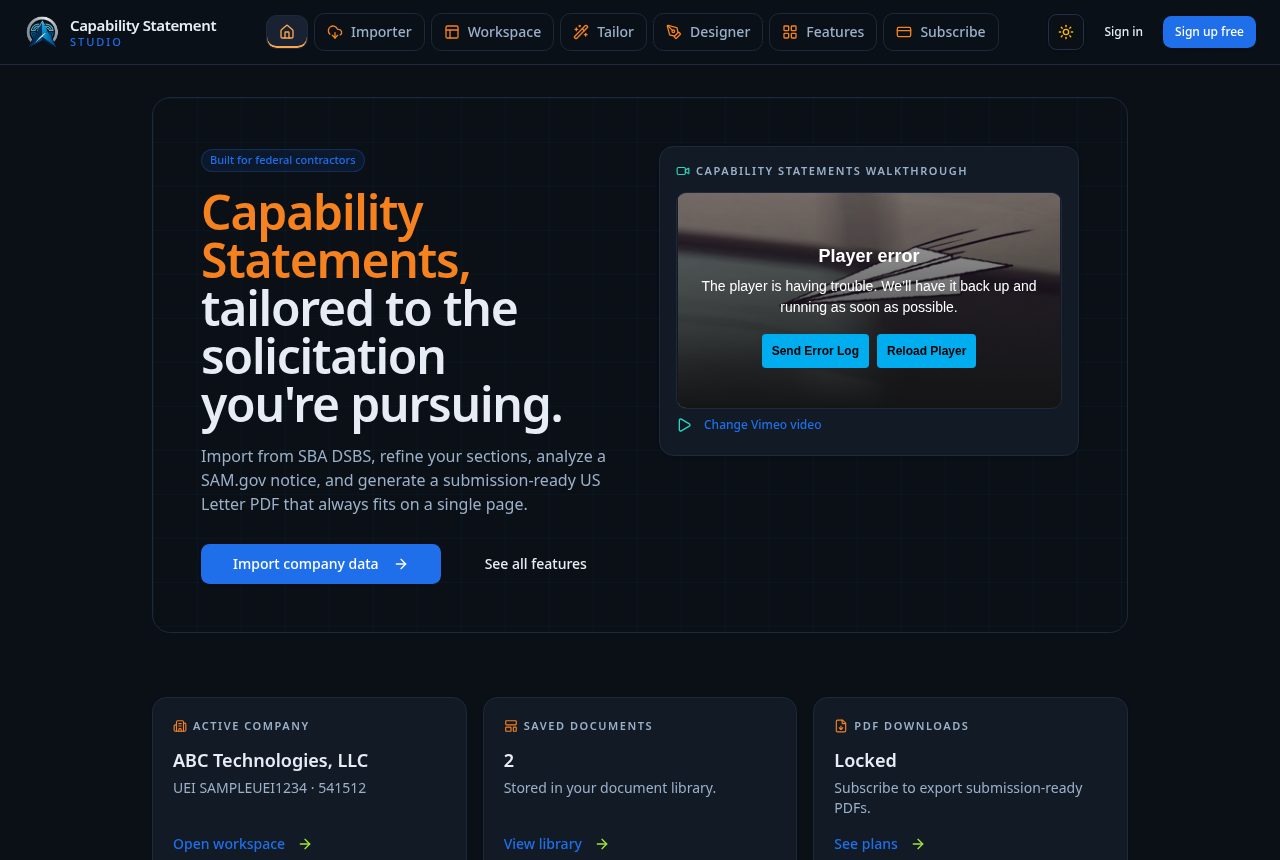
- 1
Choose Sign up free, or Sign in
Both buttons sit at the top right of every screen and open the same screen in the right mode: Sign up free opens registration, Sign in opens the sign in form. Email and password, or continue with Google. A Go to Homepage button under the card takes you back out.
- 2
Confirm your email
Open the confirmation message and click the link. Confirmation is what links your saved documents to you on any device you sign in from.
- 3
Reset a forgotten password
Forgot password on the sign in form emails you a reset link that opens the reset screen. Usernames cannot be self served: if you have lost access to the email on the account, write to support@armadacyberdefense.us.
Forgot passwordsupport@armadacyberdefense.us - 4
Set your display name and avatar
Account settings holds your name, avatar, contact email, and password. Your avatar is stored on your account, so it survives sign outs, new devices, and site updates.
AccountProfile - 5
Understand the free allowance
New accounts include a starter allowance of AI tokens and document generations. The Subscribe screen shows what your plan includes and what you have used.
Tips
- Signed out, the app fills itself with the ABC Technologies, LLC sample so you can explore every screen safely.
- Use the theme toggle beside Sign in to switch between light and dark.
- Administrators land on the Admin console straight after signing in. Everyone else lands in Workspace.
Import is the fastest way to a complete profile. Search the SBA DSBS registry, pull from SAM.gov, upload an existing capability statement, or start from a blank profile and type it in.
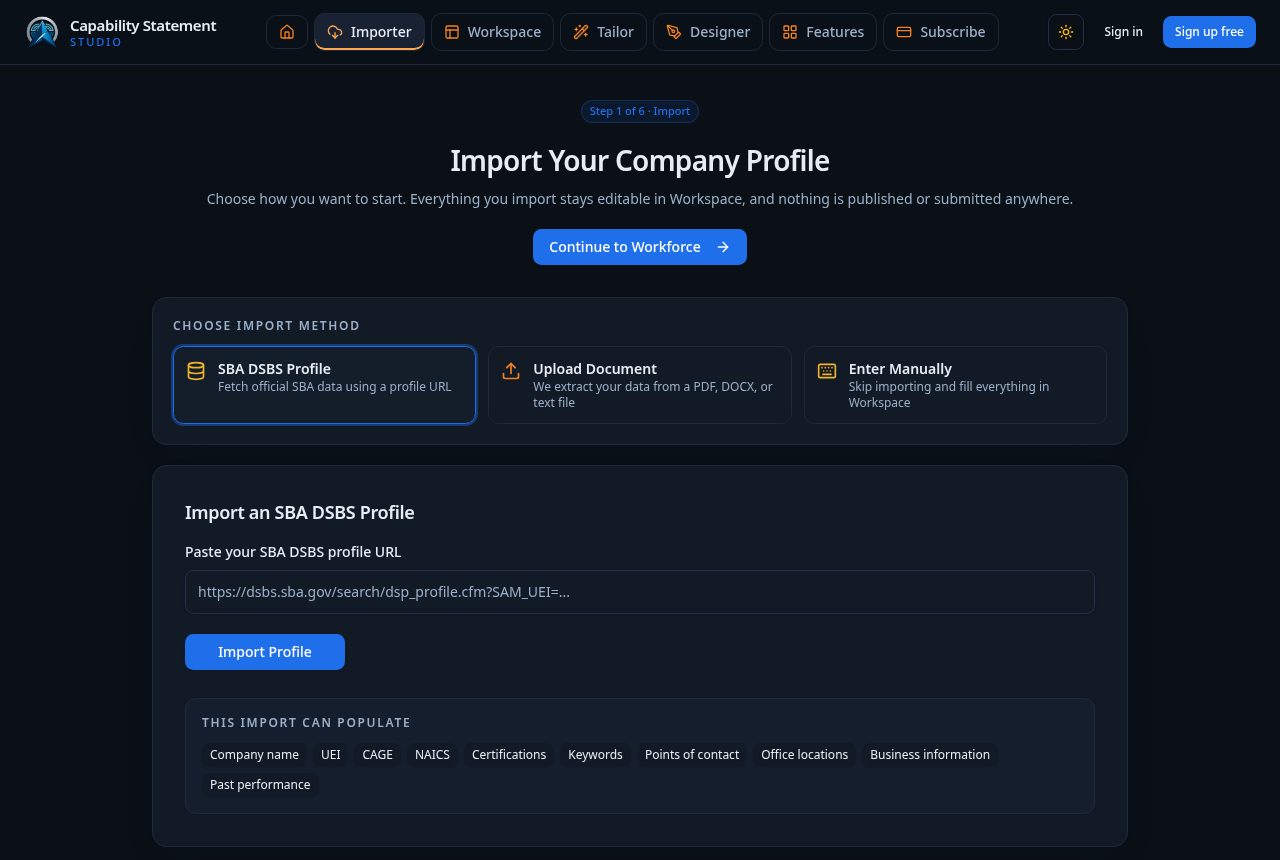
- 1
Search the registry
Type your legal business name, UEI, or CAGE code. For the sample company you would search ABC Technologies, LLC and match on UEI SAMPLEUEI1234.
ABC Technologies, LLCUEI SAMPLEUEI1234CAGE 8XK21 - 2
Review the match before you accept it
Check the address, NAICS codes, and certifications against your own records. Registry data can lag behind reality, so anything stale should be corrected in Workspace after import.
- 3
Or upload a document you already have
A previous capability statement in PDF or Word can be read directly. Headings such as Core Competencies, Past Performance, and Differentiators are recognized and mapped into the matching sections. Scanned, image only pages are read with OCR.
- 4
Or start blank
Create an empty profile and fill the sections yourself in Workspace. This is the right choice for a brand new entity with no registry footprint yet.
Tips
- Import as much as you can even if it is imperfect. Correcting a prefilled field is faster than typing one from scratch.
- Importing again later does not wipe your edits, it creates content you can accept section by section.
Workspace holds everything the document can say. Profiles let you keep separate versions per agency or joint venture, and the section checklist controls what appears in the PDF.
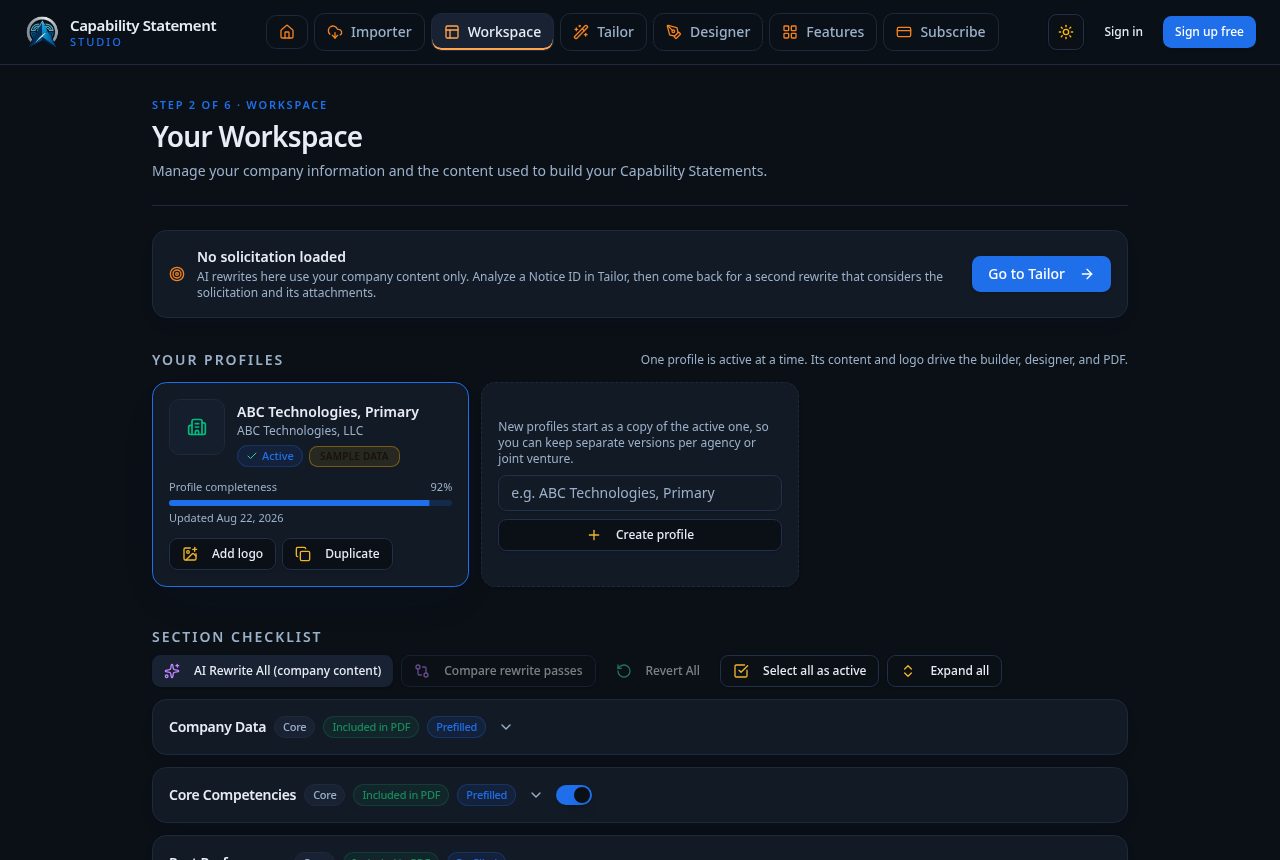
- 1
Set the active profile
The card marked Active is the one every other screen reads. Use Duplicate to branch a profile for a specific agency, then rename it, for example ABC Technologies, Army.
ABC Technologies, PrimaryActive92% complete - 2
Add your logo
Add logo on the profile card opens a cropper. A square or wide PNG with a transparent background works best. The logo appears in the template masthead.
- 3
Fill Company Data first
UEI, CAGE, business type, structure, NAICS and PSC codes, contract vehicles, certifications, geographic coverage, security clearances, address, and contact details. Business type is a controlled list, so pick the closest match rather than typing a variant.
Limited Liability CompanySDVOSB541512GSA MAS SIN 54151SArlington, VA (HQ)Secret - 4
Use Anything Else for what has no field
Anything Else carries facts the standard fields do not cover, such as a teaming posture, an award, or a partnership. Give it an importance weight so the layout engine knows how hard to fight for its space.
- 5
Write the narrative sections
Core Competencies, Differentiators, and Past Performance carry the argument. Write in plain, specific language: what you do, for whom, at what scale, with what measured result.
- 6
Use AI Rewrite when the draft is rough
AI Rewrite All rewrites every active section using only your own content, never invented facts. Compare rewrite passes shows the before and after side by side, and Revert All puts your wording back.
- 7
Choose what reaches the PDF
Each section has a toggle. Included in PDF means it will be laid out by the template. Turning a section off frees its space for the sections that matter for this pursuit.
Tips
- Profile completeness is a guide, not a gate. A 92% profile with strong past performance beats a 100% profile of generic claims.
- Past performance entries carry a customer, contract number, dates, and value. Fill those fields even if the description is short, because the facts only view uses them.
- Numbers persuade. 98.6% SLA attainment reads better than excellent service delivery.
A general statement wins nothing. Tailor reads a specific SAM.gov notice, including its attachments, and tells you which of your content to foreground for that opportunity.
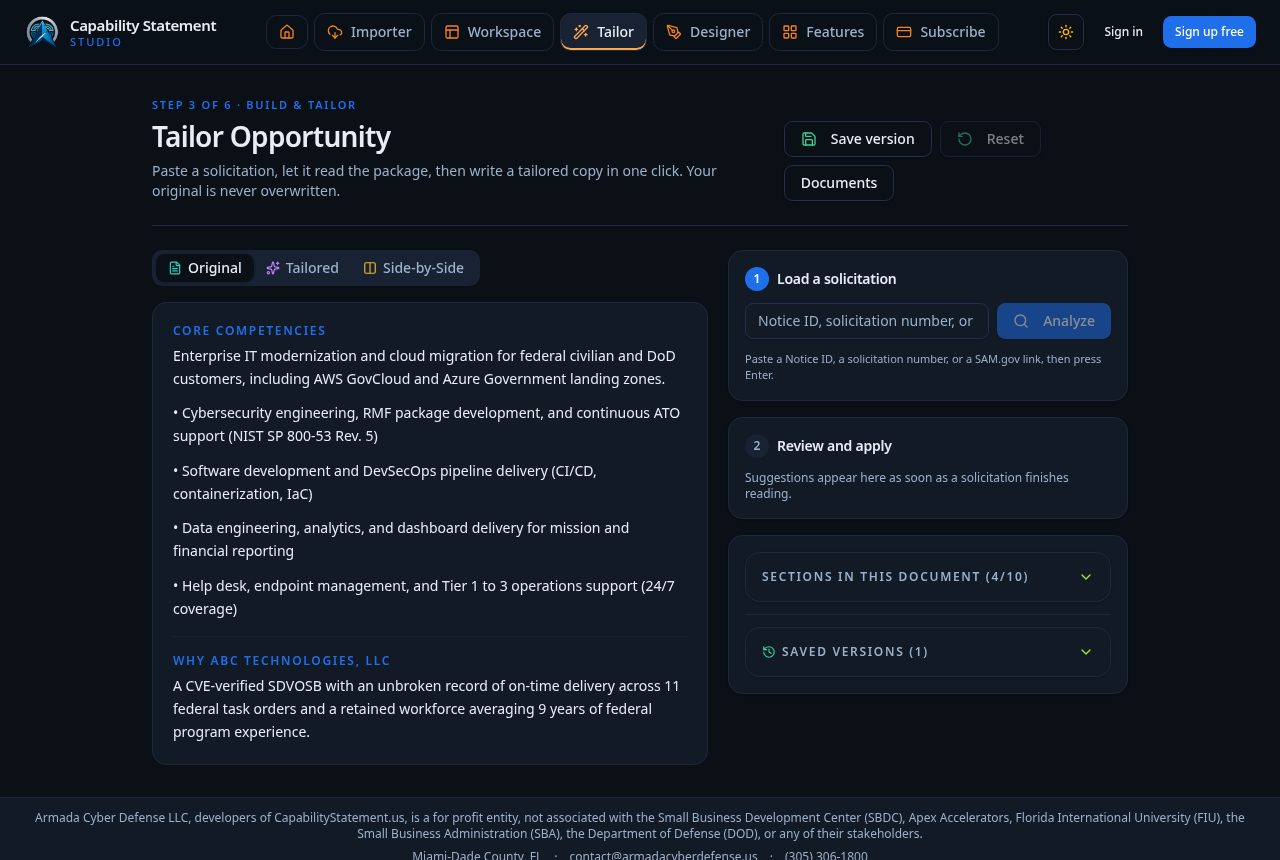
- 1
Paste the Notice ID
Copy the Notice ID from the SAM.gov opportunity page and paste it in. The analysis pulls the notice, its NAICS and PSC codes, set aside status, due dates, and any attachments it can read.
- 2
Read the coverage report
The report shows where your content already matches the requirement and where it is silent. Gaps are the useful part: they tell you what to add in Workspace before you generate.
- 3
Apply recommendations selectively
Each recommendation can be applied or ignored. Applying one rewrites the affected section with the solicitation in view. Nothing is applied without your click.
- 4
Work the numbered steps
The guided rail across the top numbers each stage, marks the one you should do next, and explains in a tooltip why it comes next. Selecting a step scrolls you to its card, and the next action on that card glows.
- 5
Hide the document for more room
Hide document collapses the original, tailored, and side by side panel and spreads the guided rail across the full width in multiple columns. Your choice is remembered, so the page reopens the way you left it.
- 6
Reset before the next pursuit
Reset clears the loaded notice and its suggestions so the next analysis starts clean. Do this whenever you move to a different opportunity.
Tips
- Run Tailor before the second AI rewrite in Workspace. With a notice loaded, rewrites consider the solicitation instead of your content alone.
- Keep a duplicated profile per major agency so tailored wording for one pursuit does not overwrite another.
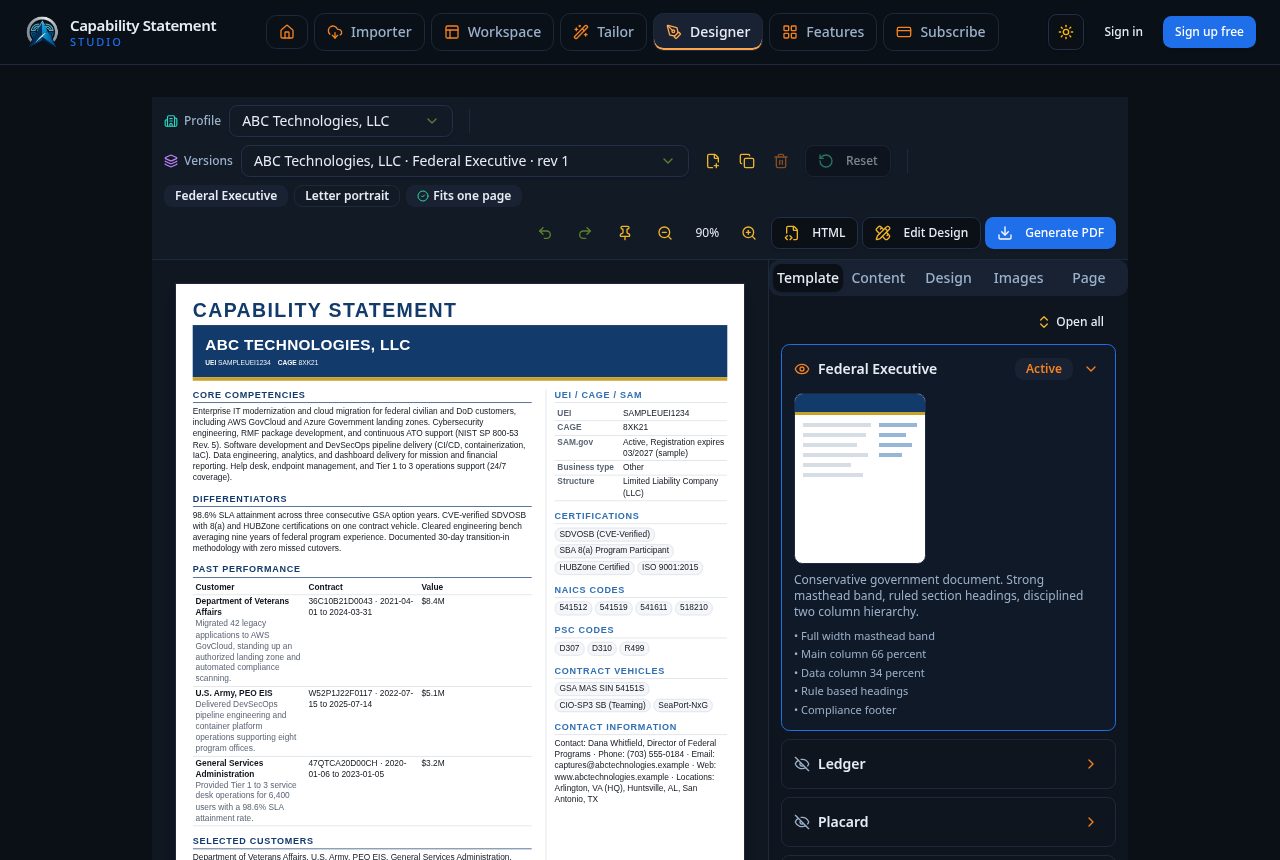
Templates are real page architectures, not color swaps. Each one distributes the page differently, so the right choice depends on whether your strength is past performance, certifications, or narrative.
- 1
Confirm the profile and version
The top bar shows the active profile and the document version, for example ABC Technologies, LLC, Federal Executive, rev 1. New versions are created as you work, and Reset returns to the last saved state.
- 2
Pick a template from the Template tab
Each entry describes its structure: masthead style, column split, heading rules, and footer. Click one to make it active and the preview redraws immediately.
Capability AtlasCredential DossierContract EvidenceEditorial TribuneProcurement ConsoleCredential Corridor - 3
Watch the fit indicators
Letter portrait and Fits one page sit beside the template name. If a warning appears, the content is too long for the page and the Content tab is where you fix it.
- 4
Check the validation line
Below the preview the app reports validation issues. No validation issues means the preview is exactly the document that will be sent to the renderer.
Tips
- Twelve architectures were added in August 2026, among them Capability Atlas, Credential Dossier, Contract Evidence, Editorial Tribune, Procurement Console, Credential Corridor, Strata Bands, Capability Hub, Delivery Cadence, Ordinance Fact Sheet, Opportunity Vector, and Quarry. They sit alongside Ledger, Placard, Broadsheet, Blueprint, Stamp, and Bands.
- Every template enforces the same rules: US Letter portrait, one page, 12pt minimum body text, and a Capability Statement title larger than any other text.
- Print a candidate in grayscale. A template that still reads clearly without color is the one that survives a contracting officer's printer.
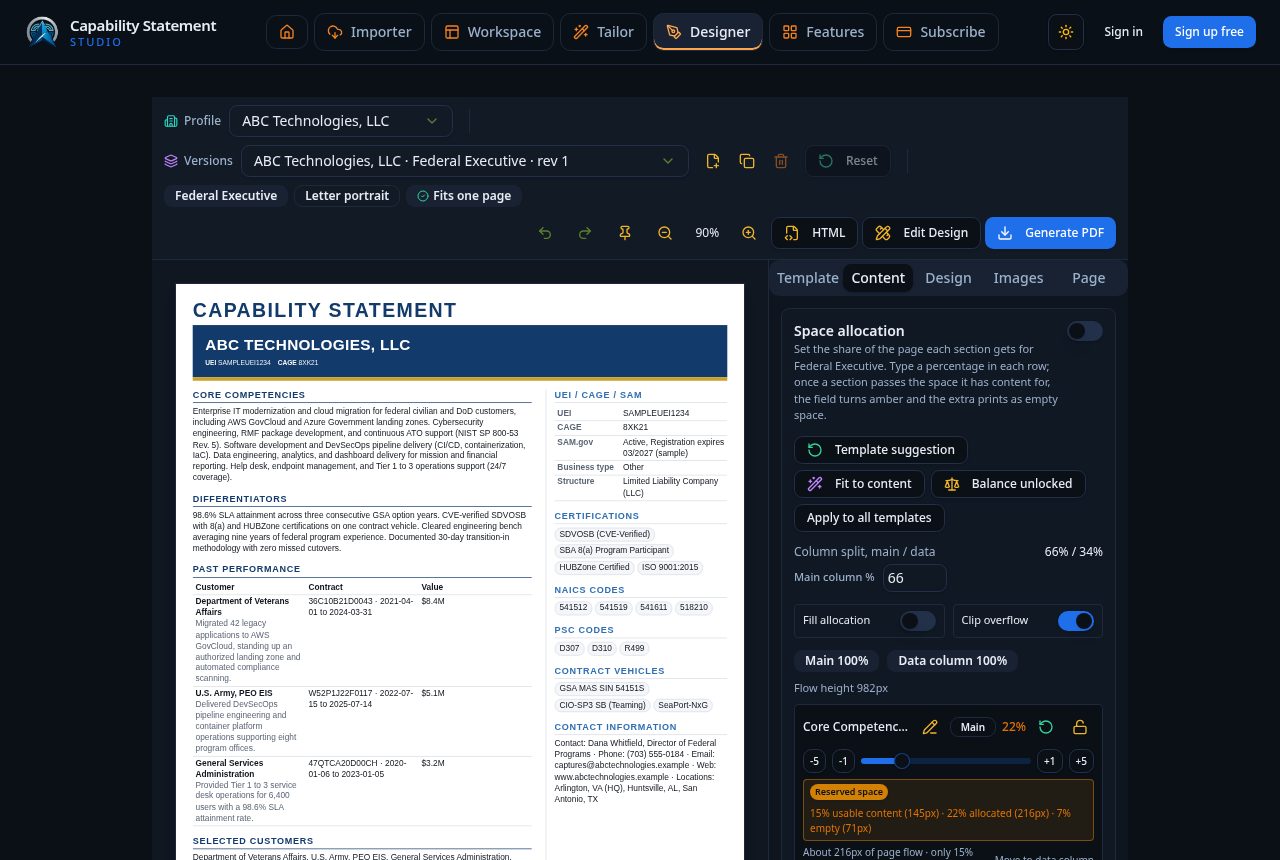
The Content tab decides how much of the page each section gets. Move a slider and the AI rewrites that section to fit the new space, ending on complete sentences rather than cutting words off.
- 1
Give space to your strongest section
Drag a section slider up and the others give ground. Use the step buttons for precise moves: minus five, minus one, plus one, plus five percent.
- 2
Let the rewrite finish
While the AI is refitting a section, that card shows a spinner and its controls lock so two rewrites cannot fight over the same space. Cancel stops a single section without touching the others.
- 3
Use facts only for long past performance
Past performance, facts only drops the narrative description and keeps the heading, contract number, dates, and value. It is the fastest way to recover a third of a page.
- 4
Reset a section you over-tuned
Each card has its own reset icon that returns that one section to the value it had when you opened the document, and Reset all to start returns every section at once.
- 5
Find the sections that are holding space
Sections with reserved space are grouped under their own collapsible panel at the bottom of the list, so the sections you are actively tuning stay at the top.
Tips
- Text never ends in an ellipsis. If a section will not fit, whole items are dropped rather than sentences being cut mid word.
- Allocate before you fine tune colors. Layout changes can undo type adjustments.
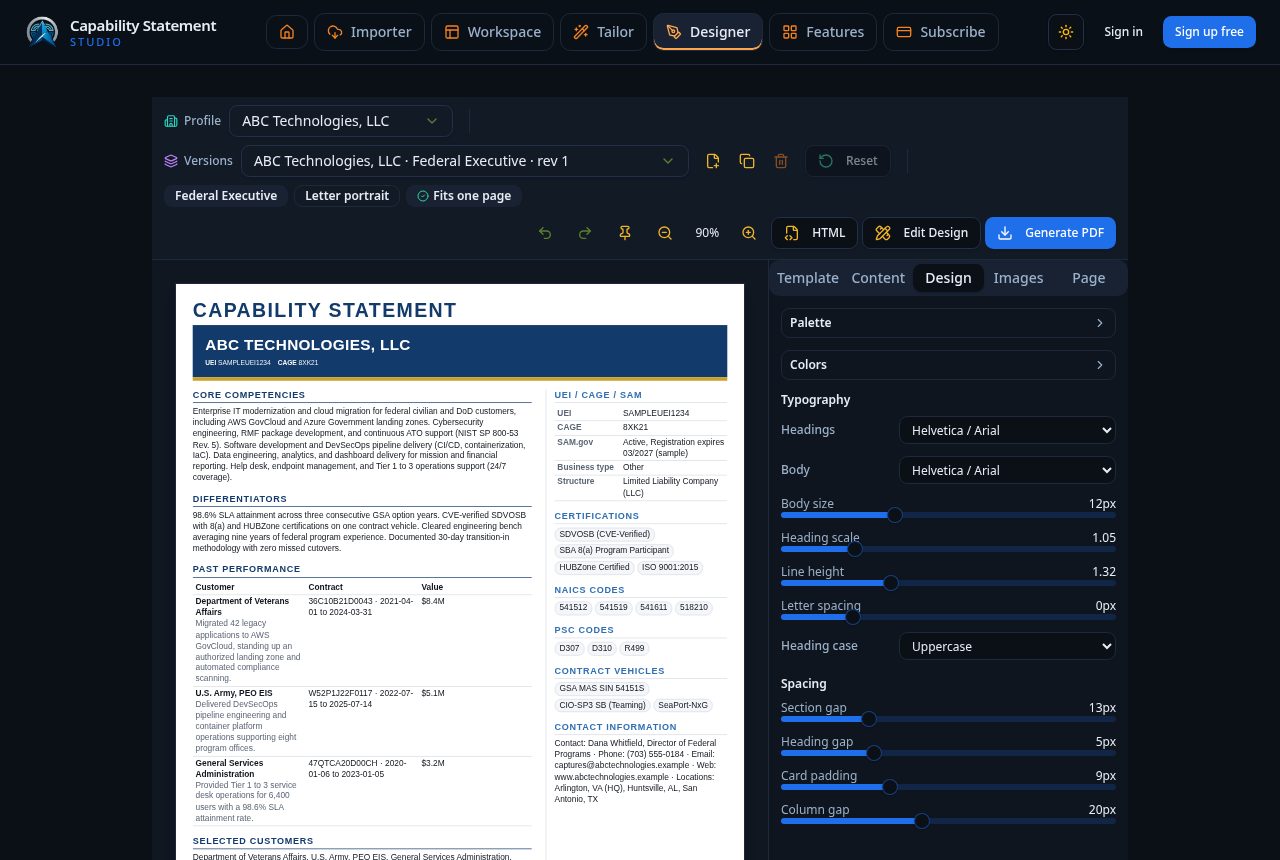
The Design tab controls the look inside the template's structure: palette, individual colors, and font pairing. The rules that protect readability stay in force whatever you choose.
- 1
Start from a palette
Palettes are pre balanced for print. Pick the one closest to your brand, then adjust individual colors only if you have to.
- 2
Adjust single colors carefully
Open Colors to set the masthead, rule lines, headings, and accents. Keep dark text on light backgrounds: a contracting officer will read this on paper.
- 3
Choose a font pairing
Pairings set a heading face and a body face together. Body text never renders below 12pt regardless of the pairing.
- 4
Add images if the template supports them
The Images tab holds your uploads and AI generated graphics, and places them into image slots in the layout.
Tips
- Two colors plus black is enough. A third accent usually makes the page busier, not stronger.
- If your logo has a strong brand color, use it for rule lines rather than for large filled blocks.
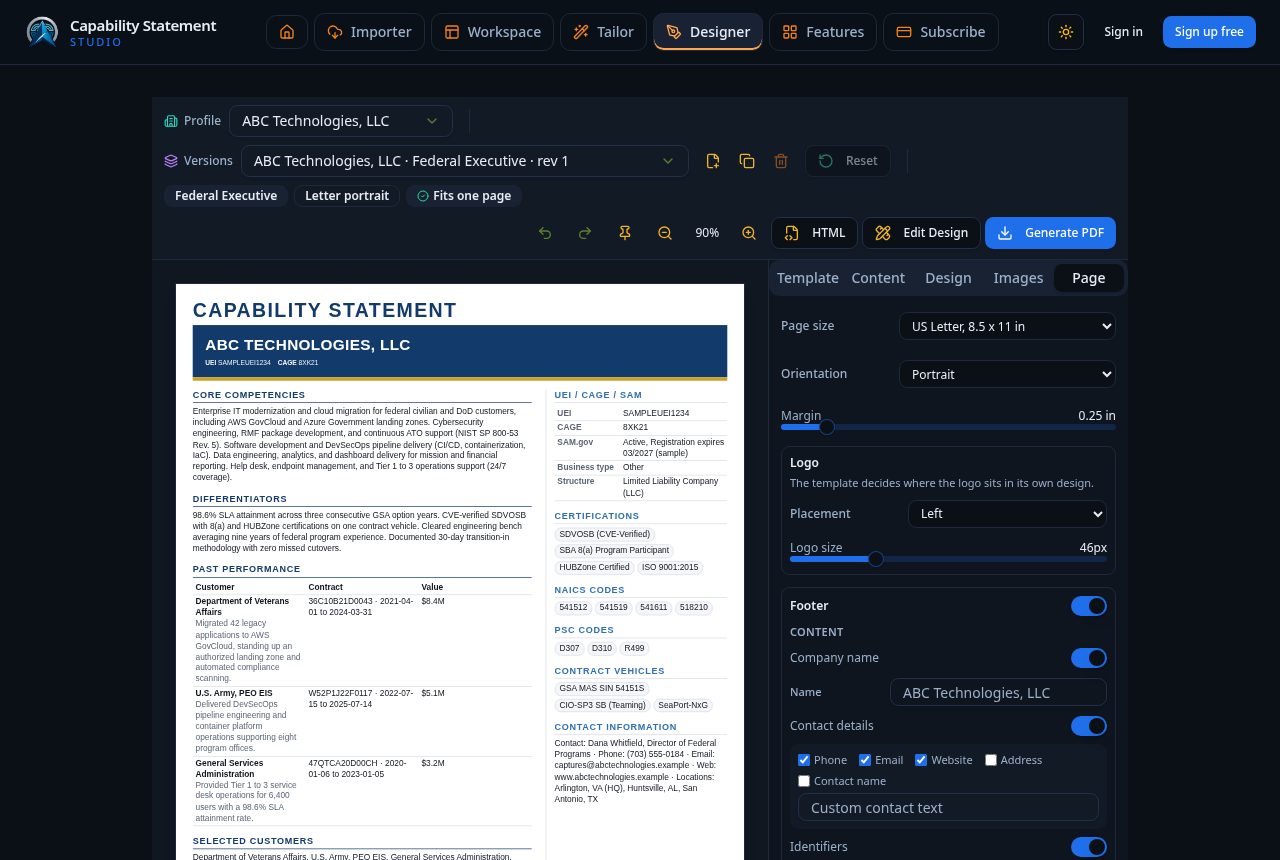
Every statement prints the words Capability Statement as the largest type on the page, and the Page tab controls the compliance footer at the bottom: its content, type, and formatting.
- 1
The title is automatic
The words Capability Statement always print and are always the largest text on the page. Each template sets their placement, colour, and font, and the app adds the line only when a template has not printed one itself.
- 2
One line, never a banner
The old full width identity strip with a UEI and CAGE box is gone for good. The title is a single compact line, so the page keeps its space for evidence.
- 3
Write the footer
The footer usually repeats the essentials a reviewer needs when the page is separated from an email: company name, phone, contact email, website, UEI, and CAGE.
ABC Technologies, LLC(703) 555-0184UEI SAMPLEUEI1234CAGE 8XK21 - 4
Format the footer for print
Footer type can be smaller than body text but should stay legible on paper. Check it in the preview at 100% zoom before you generate.
Edit Design opens the document on a canvas where you move, resize, group, insert, and delete elements directly. It is optional: most statements never need it.
Core Competencies
Past Performance, selected
Resize handle, drag to fit
Insert / Delete
- 1
Open it from the Designer
Press Edit Design in the Designer toolbar. Back to Designer returns you, and your work follows you back.
- 2
Select, group, and move
Click an element to select it, drag a marquee to select several, then move them together. Alignment guides and snap to grid keep everything on a consistent rhythm.
- 3
Insert and delete
The Insert / Delete panel adds headings, paragraphs, lists, tables, badges, rules, and spacers. Deleting a block frees space, and Delete and refit with AI condenses the remaining copy to fill the gap.
- 4
Fix overflow in one click
When a box clips its own content a warning appears with the element and how many pixels it is short. Fix expands that section, and heights re-settle automatically after any AI rewrite.
- 5
Undo anything
Every action, including AI reflow, is undoable. Work fearlessly, then undo back to the last good state if an experiment fails.
Tips
- Set fit padding to about 8px so an expanded box does not clip again when text reflows.
- If the canvas starts to feel messy, return to the Designer and re-allocate space instead of nudging boxes one at a time.
Generate PDF renders the exact document shown in the preview as a single page US Letter file, ready to attach to an email or a submission portal.
Checked before every render
- US Letter portrait, exactly one page
- Body text never below 12pt
- Capability Statement title larger than any other text
- No sentence ends in an ellipsis
- Footer carries UEI, CAGE, and contact details
- 1
Clear validation first
Generate only after the line under the preview reads no validation issues. Warnings there almost always mean text is overflowing or a required element is missing.
- 2
Press Generate PDF
The file is rendered server side from the same HTML you are previewing, so the PDF matches the screen. It opens in a new tab, so allow pop ups for this site.
- 3
Save it with a useful name
Name files so you can find them under deadline pressure, for example abc-technologies-army-peo-eis-2026-08.pdf.
- 4
Or email it instead of downloading
Email PDF renders the document and opens the composer with the file attached, where you set the recipients, subject, and message. It works the same way from the Tailor screen.
Email PDF - 5
Check it on paper
Print one copy at 100%, no scaling. Confirm the title dominates, body text is comfortable, and nothing sits inside the printer's margin.
Tips
- HTML in the toolbar exports the underlying markup if a teammate needs the source.
- Every generated document is added to your library automatically.
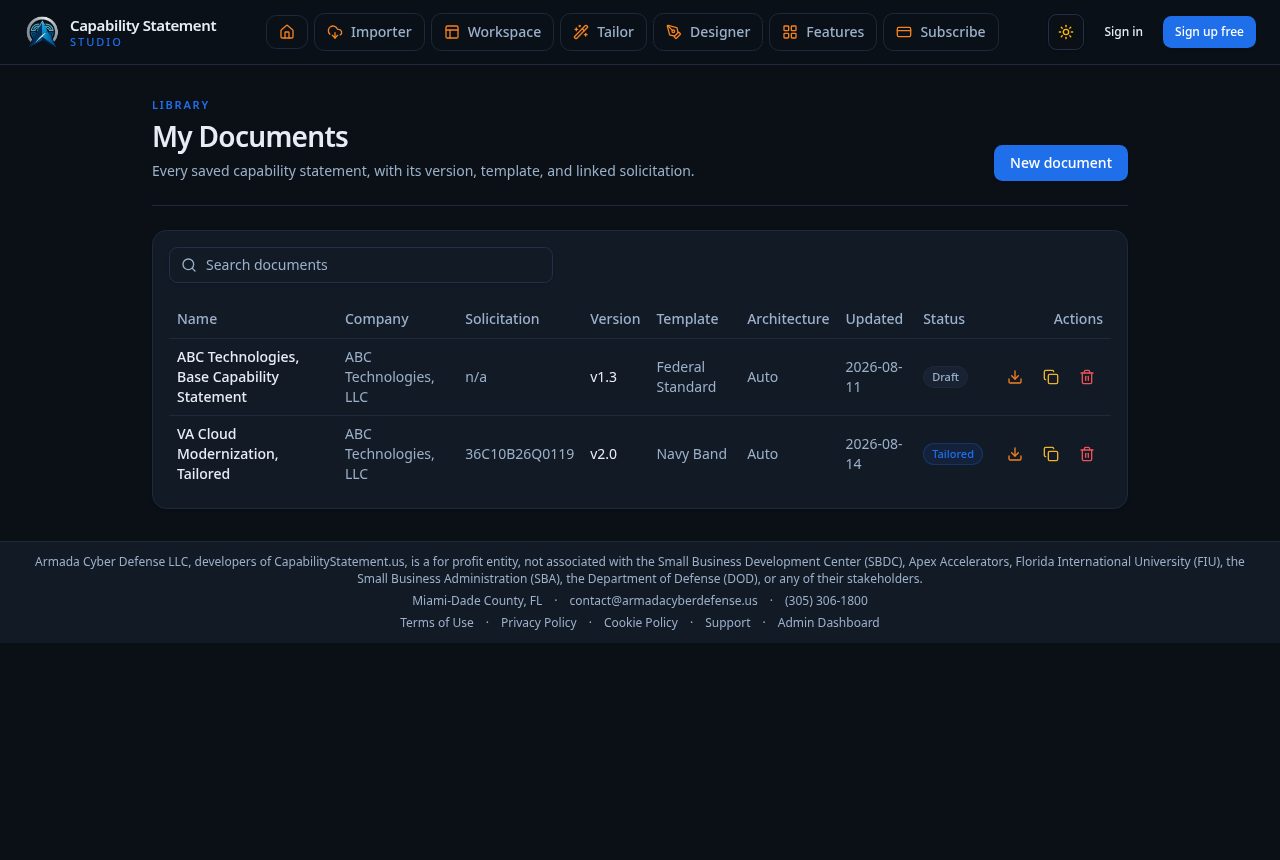
My Documents lists every saved capability statement with its profile, template, and date, so past submissions stay reusable.
- 1
Reopen a document
Opening a saved document restores its template, content allocation, and styling in the Designer exactly as you left it.
- 2
Duplicate before a new pursuit
Duplicate an existing statement and tailor the copy. The original stays intact as your baseline.
- 3
Keep names consistent
Agency plus opportunity plus month is a naming pattern that stays sortable as the library grows.
- 4
Remove what is stale
Delete removes a document from the library. Old documents built on out of date certifications are a liability, not an archive.
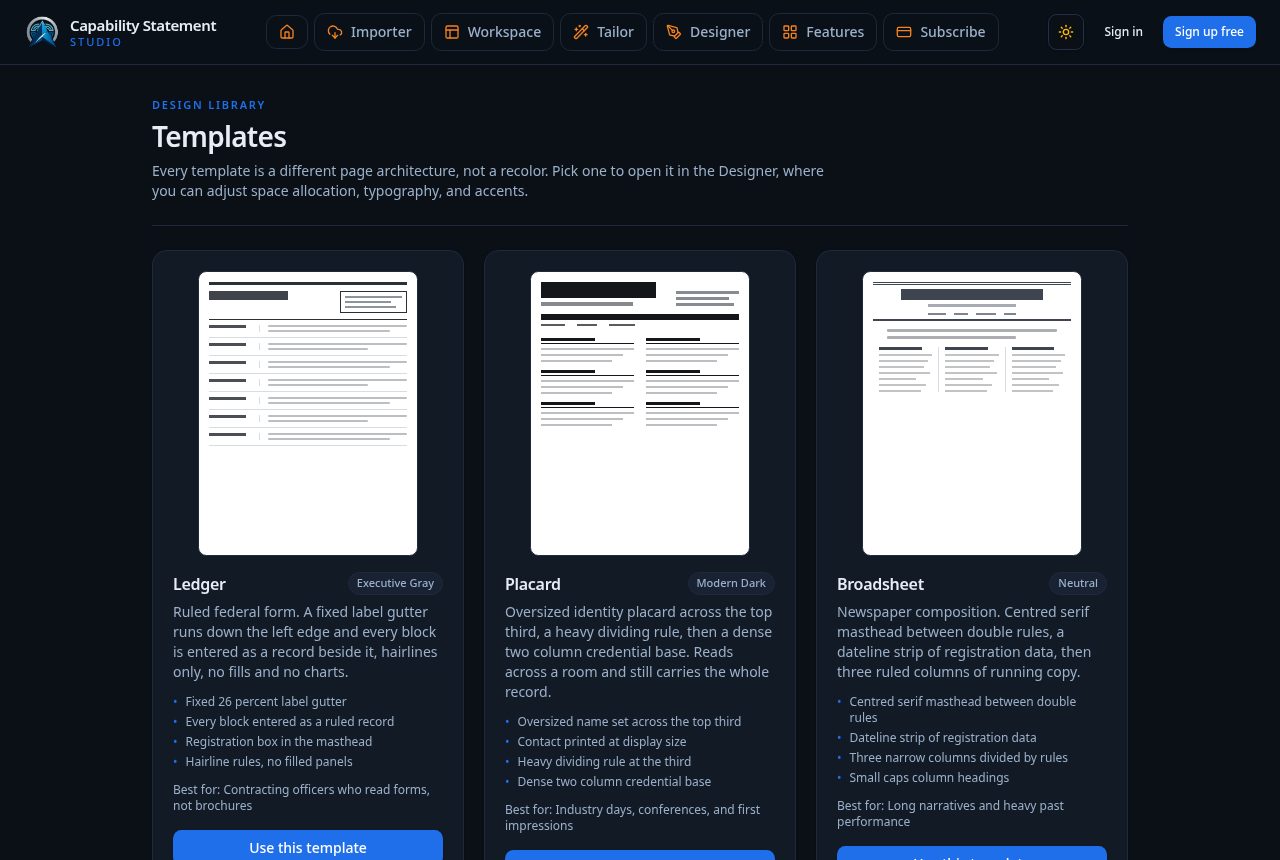
The Templates page shows every published layout with a full page preview, so you can compare architectures before committing in the Designer. Eighteen architectures are published today, and administrators can add, hide, or retire them.
- 1
Compare structures
Look at where each layout puts past performance, codes, and certifications. Choose the one whose emphasis matches your strongest evidence.
- 2
Preview at full size
Open a template preview to see a complete US Letter page rather than a thumbnail.
- 3
Switch any time
Changing template in the Designer keeps your content and re-flows it into the new architecture.
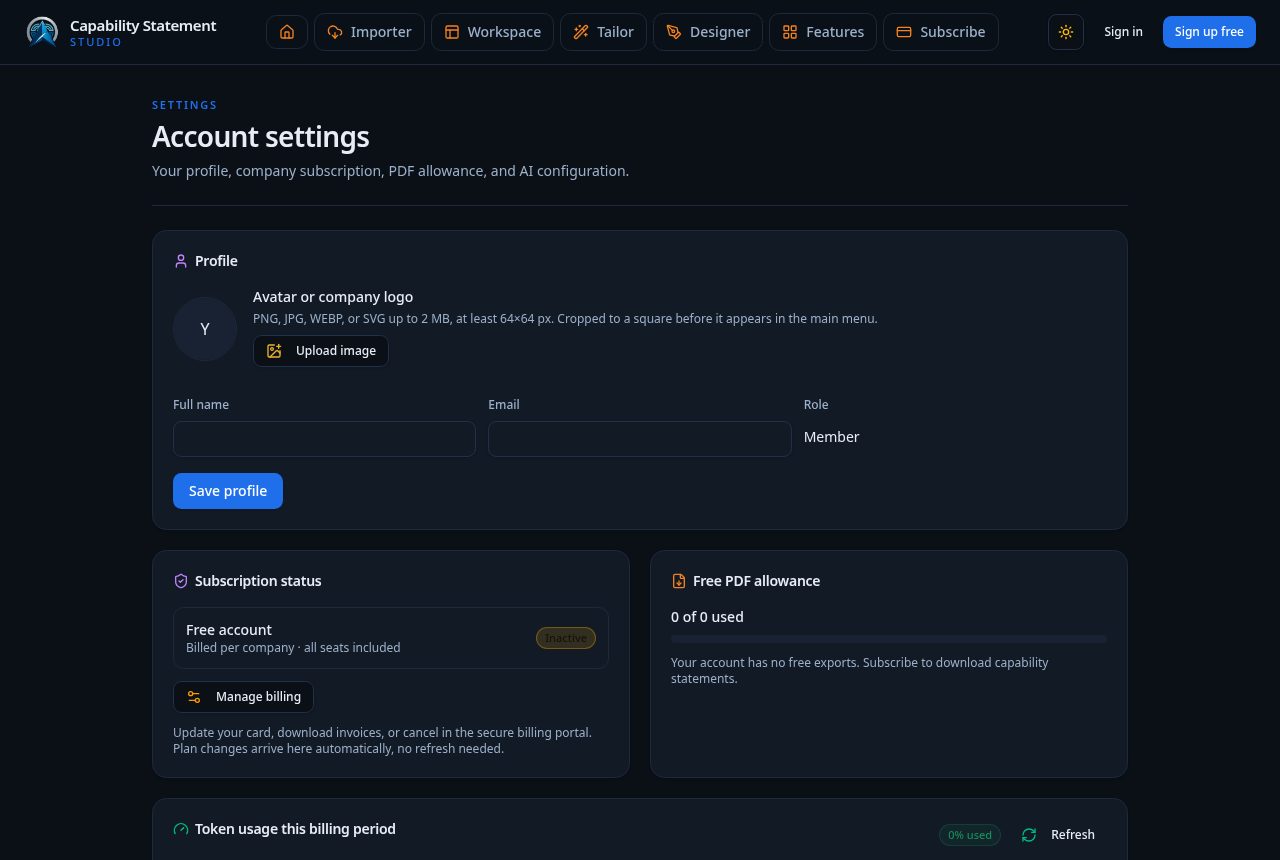
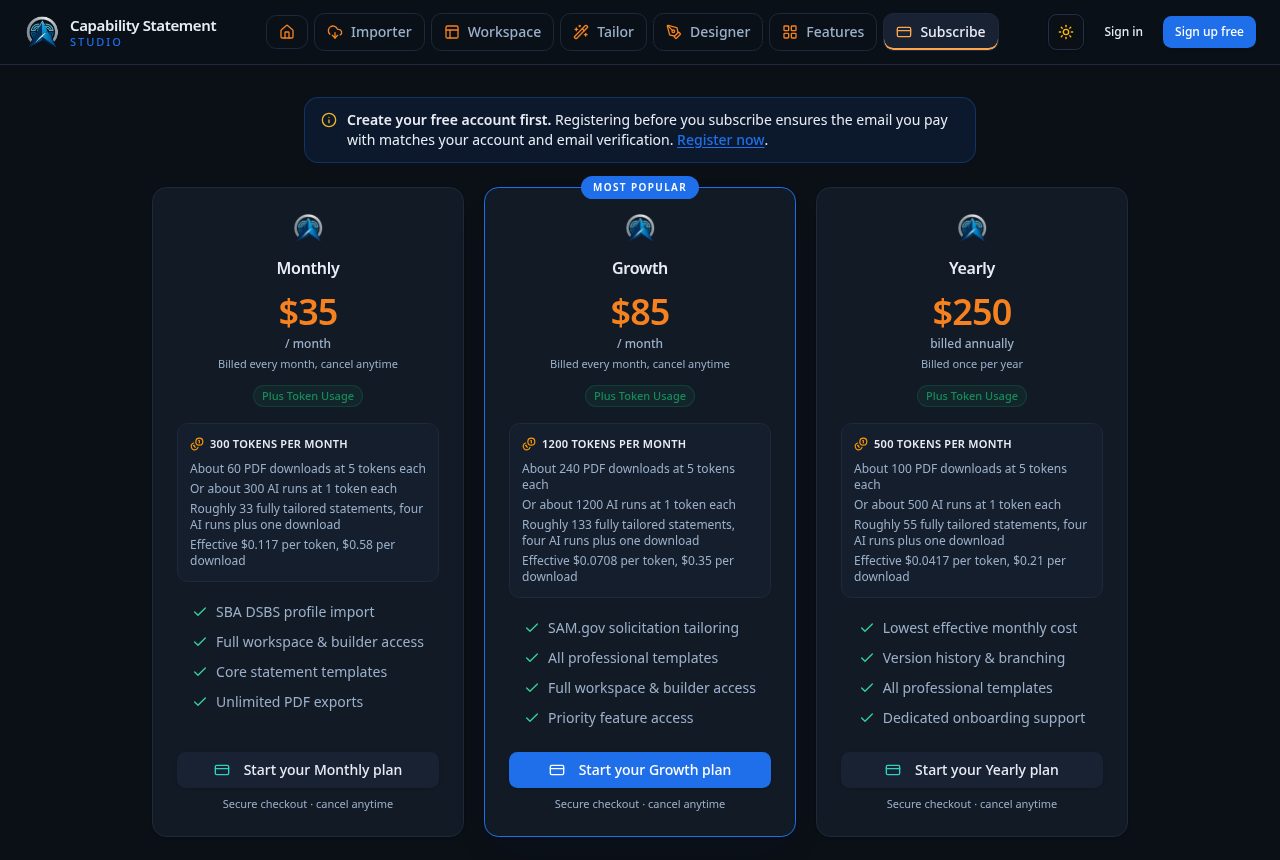
Account settings holds your profile and company defaults. Subscribe shows plans, what each includes, and how much of your AI allowance you have used.
- 1
Keep your contact details current
The contact block feeds document footers, so a stale phone number ends up on a submitted statement.
- 2
Watch your AI allowance
Rewrites, tailoring, and image generation consume tokens. Usage is shown against your plan so a deadline never meets a surprise limit.
- 3
Change plans when volume grows
Upgrading raises document and AI limits immediately. Downgrades take effect at the end of the current period.
- 4
Manage security
Change your password from Account settings, and sign out from the header menu on shared machines.
The issues most people hit in their first week, and the shortest path through each one.
- 1
My content will not fit on one page
Open the Content tab, lower the allocation on your weakest section, and switch past performance to facts only. If it still overflows, turn a non essential section off in Workspace.
- 2
The AI rewrite is taking too long
Sections rewrite in parallel and cached results return instantly. If one section stalls, cancel that section and rerun it rather than reloading the page.
- 3
The PDF did not open
The file opens in a new tab, so allow pop ups for this site and try again. If the renderer reports an error, clear validation issues first.
- 4
My logo looks wrong
Re-upload a higher resolution PNG with a transparent background and re-crop it. Very wide logos work better in mastheads than tall ones.
- 5
Suggestions from an old opportunity are still showing
Press Reset on the Tailor screen. That clears the loaded notice and its recommendations before you analyze the next one.
- 6
The same fact is printed twice
Pick a different template. Each architecture prints its identifiers once, either in a strip, a rail, or a plinth, and everything else flows around it.
- 7
I want my original wording back
Revert All in Workspace restores your text, and the Designer keeps versions you can return to. Nothing the AI writes is permanent.